Windows Explorer Not Responding: The Ultimate Troubleshooting Guide
Tired of Windows Explorer not responding? Learn proven solutions from IT experts to fix and prevent File Explorer issues for good.
Are you frustrated with Windows Explorer not responding? You’re not alone. This essential component of the Windows operating system can sometimes leave users staring at a frozen screen, unable to access their files and folders. But don’t worry – we’ve got you covered with this comprehensive guide to fixing Windows Explorer issues.
Introduction: The Frustration of a Frozen File Explorer
Picture this: You’re in the middle of an important project, navigating through your files, when suddenly – everything freezes. The dreaded “Windows Explorer not responding” message appears, and your productivity grinds to a halt. It’s a common issue that plagues many IT users, from novices to professionals.
In this guide, we’ll dive deep into the world of Windows Explorer issues. We’ll explore why these problems occur, how to fix them quickly, and most importantly, how to prevent them from happening in the future. Whether you’re dealing with Windows Explorer crashes on Windows 10, struggling with search functions, or facing startup issues, we’ve got the solutions you need.
So, let’s roll up our sleeves and get your File Explorer back on track!
Understanding Windows Explorer
Before we jump into troubleshooting, let’s take a moment to understand what Windows Explorer is and why it’s so crucial to your daily computing tasks.
What is Windows Explorer?
Windows Explorer, also known as File Explorer in newer versions of Windows, is the file management application in Microsoft Windows. It provides a graphical user interface for accessing the file systems. Essentially, it’s your window into the files, folders, and drives on your computer.
Why is Windows Explorer So Important?
Windows Explorer is more than just a file browser. It’s an integral part of the Windows operating system that allows you to:
- Navigate through your file system
- Create, rename, move, and delete files and folders
- Search for specific files or content
- Access network locations and shared folders
- Manage system settings and properties
When Windows Explorer stops responding, it can feel like your entire computer has ground to a halt. That’s why it’s crucial to know how to troubleshoot these issues effectively.
Common Scenarios: When Windows Explorer Stops Responding
Let’s look at some of the most common scenarios where users encounter Windows Explorer not responding:
- Windows Explorer not starting: You try to open File Explorer, but nothing happens.
- Windows Explorer crashes on Windows 10: File Explorer opens but then suddenly closes or freezes.
- Windows Explorer not responding on startup: Your computer boots up, but File Explorer never fully loads.
- Windows Explorer not responding when searching: The search function within File Explorer becomes unresponsive.
- Windows Explorer not responding after an update: A recent Windows update seems to have broken File Explorer.
- Windows Explorer not responding when connected to a USB drive: Plugging in an external drive causes File Explorer to freeze.
Now that we’ve identified these common scenarios, let’s dive into how to fix them.
Troubleshooting Windows Explorer Not Responding
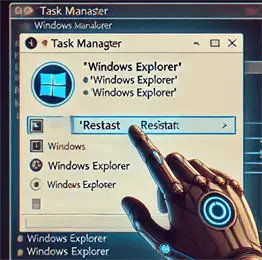
1. Restart Windows Explorer
Often, the simplest solution is the most effective. Restarting Windows Explorer can resolve many issues:
- Press
Ctrl + Shift + Escto open Task Manager. - In the “Processes” tab, find “Windows Explorer.”
- Right-click on it and select “Restart.”
If you can’t find Windows Explorer in the list:
- Click “File” in Task Manager.
- Select “Run new task.”
- Type
explorer.exeand hit Enter.
2. Check for Windows Updates
Keeping your system up-to-date can prevent many Explorer issues:
- Press
Windows Key + Ito open Settings. - Go to “Update & Security.”
- Click “Check for updates” and install any available updates.
3. Run the System File Checker
Corrupted system files can cause Explorer to malfunction. Here’s how to check and repair them:
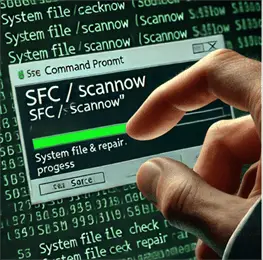
- Open Command Prompt as administrator.
- Type
sfc /scannowand press Enter. - Wait for the process to complete and restart your computer.
4. Disable Unnecessary Startup Items
Too many programs starting with Windows can overload Explorer:
- Open Task Manager.
- Go to the “Startup” tab.
- Disable any unnecessary programs.
5. Update or Rollback Drivers
Faulty drivers can cause Explorer to crash:
- Open Device Manager.
- Right-click on your device categories (especially display adapters).
- Choose “Update driver” or “Roll back driver” if issues started after a recent update.
6. Perform a Clean Boot
A clean boot can help identify if third-party software is causing the issue:
- Type
msconfigin the Start menu and open System Configuration. - Go to the “Services” tab.
- Check “Hide all Microsoft services.”
- Click “Disable all.”
- Go to the “Startup” tab and click “Open Task Manager.”
- Disable all startup items.
- Restart your computer.
7. Rebuild the Search Index
If Explorer is not responding when searching:
- Open Control Panel.
- Go to “Indexing Options.”
- Click “Advanced.”
- Click “Rebuild.”
8. Check for Malware
Malware can cause Explorer to behave erratically:
- Run a full system scan with Windows Defender or your preferred antivirus software.
- Consider using Malwarebytes for a second opinion scan.
Specific Solutions for Different Windows Versions
Windows Explorer Not Responding on Windows 7
- Run the System File Checker as mentioned earlier.
- Perform a clean boot to identify conflicting software.
- Check for and install any available Windows updates.
Windows Explorer Not Responding on Windows 10
- Try using the built-in troubleshooter:
- Go to Settings > Update & Security > Troubleshoot
- Run the “Windows Store Apps” troubleshooter
- Reset File Explorer options:
- Open File Explorer
- Click on “View” > “Options”
- Click “Restore Defaults” under each tab
Windows Explorer Not Responding on Windows 11
- Ensure your system meets the minimum requirements for Windows 11.
- Update all drivers, especially graphics and chipset drivers.
- Try resetting Windows Explorer settings:
- Open File Explorer
- Click the three dots (…) > Options
- Click “Restore Defaults” under each tab
Advanced Troubleshooting Techniques
For more persistent issues, try these advanced techniques:
Create a New User Account
Sometimes, user profile corruption can cause Explorer issues:
- Go to Settings > Accounts > Family & other users.
- Click “Add someone else to this PC.”
- Follow the prompts to create a new account.
- Log in to the new account and see if the issue persists.
Perform a System Restore
If the problem started recently, you might be able to roll back to a working state:
- Type “System Restore” in the Start menu search.
- Choose “Create a restore point.”
- Click “System Restore.”
- Follow the wizard to choose a restore point before the issues began.
Repair or Reset Windows
For severe issues, you might need to repair or reset Windows:
- Go to Settings > Update & Security > Recovery.
- Under “Reset this PC,” click “Get started.”
- Choose to keep your files or remove everything.
Preventing Future Windows Explorer Issues
An ounce of prevention is worth a pound of cure. Here are some tips to keep Windows Explorer running smoothly:
- Regular Maintenance: Run disk cleanup and defragmentation regularly.
- Keep Windows Updated: Enable automatic updates to ensure you have the latest fixes.
- Manage Startup Programs: Regularly review and disable unnecessary startup items.
- Be Cautious with Extensions: Only install File Explorer extensions from trusted sources.
- Regular Backups: Keep your important files backed up in case of system issues.
Key Takeaways
- Restarting Windows Explorer is often the quickest fix for many issues.
- Keeping your system updated can prevent many Explorer problems.
- Running system file checks and malware scans can resolve underlying issues.
- Different Windows versions may require slightly different troubleshooting approaches.
- Regular maintenance and careful management of startup programs can prevent future issues.
FAQ: Windows Explorer Not Responding
- Q: Why does Windows Explorer keep crashing? A: Common reasons include outdated software, corrupted system files, conflicts with third-party applications, or malware infections.
- Q: How do I fix Windows Explorer not responding on startup? A: Try disabling startup items, performing a clean boot, or running the System File Checker.
- Q: Can a virus cause Windows Explorer to stop responding? A: Yes, malware can interfere with Explorer’s functionality. Run a full system scan with updated antivirus software.
- Q: How do I restart Windows Explorer without Task Manager? A: Press
Ctrl + Alt + Delete, select “Sign out,” then sign back in to restart Explorer. - Q: Why is my File Explorer search not working? A: Try rebuilding the search index or running the search troubleshooter in Windows Settings.
- Q: How can I prevent Windows Explorer from not responding in the future? A: Keep your system updated, manage startup programs, and perform regular maintenance like disk cleanup.
- Q: Is it safe to end the Windows Explorer process? A: Yes, it’s safe. Windows will automatically restart the process, or you can manually restart it.
- Q: What should I do if Windows Explorer is not responding after a Windows update? A: Try rolling back the update, running the System File Checker, or performing a System Restore.
- Q: Can overheating cause Windows Explorer to stop responding? A: While less common, overheating can cause system instability, including Explorer issues. Ensure proper ventilation and cooling.
- Q: How do I fix Windows Explorer not responding when connected to a USB drive? A: Try updating USB drivers, scanning the drive for errors, or connecting the drive to a different port.
By following this comprehensive guide, you should be well-equipped to handle any “Windows Explorer not responding” issues that come your way. Remember, patience and systematic troubleshooting are key to resolving these frustrating problems. Happy exploring!
Related Posts to Windows Explorer not responding:
More Information: