Rufus Windows 11: The Ultimate Guide to Seamless Installation
Rufus Windows 11: Your key to effortless OS installation. Learn how to create bootable USBs, bypass TPM checks, and streamline your workflow.
Are you an IT professional looking to streamline your Windows 11 installation process? Look no further than Rufus Windows 11, the powerful tool that’s revolutionizing how we create bootable USB drives. In this comprehensive guide, we’ll dive deep into the world of Rufus Windows 11, exploring its features, benefits, and step-by-step instructions to help you master this essential utility.
Introduction: Why Rufus Windows 11 is a Game-Changer
In the ever-evolving landscape of operating systems, Windows 11 has emerged as Microsoft’s latest offering, promising enhanced performance, sleek design, and improved security features. However, the installation process can be daunting, especially when dealing with compatibility issues or unsupported hardware. This is where Rufus Windows 11 comes to the rescue.
Rufus, a free and open-source tool, has long been a favorite among IT professionals for creating bootable USB drives. With the release of Windows 11, Rufus has adapted to meet the new challenges, offering a range of features specifically designed to simplify the Windows 11 installation process.
What is Rufus Windows 11?
Rufus Windows 11 is not a separate version of Rufus, but rather the latest iterations of the Rufus tool that have been optimized to work seamlessly with Windows 11. These versions include Rufus 3.18, Rufus 3.20, and the most recent Rufus 3.22 (as of March 2023).
Key Features of Rufus Windows 11:
- Windows 11 ISO compatibility: Rufus can create bootable USB drives from Windows 11 ISO files.
- TPM and CPU check bypass: Allows installation on systems without TPM 2.0 or with unsupported CPUs.
- GPT and MBR support: Offers flexibility in choosing partition schemes.
- Customization options: Provides advanced settings for tailoring the installation process.
How to Download Rufus for Windows 11
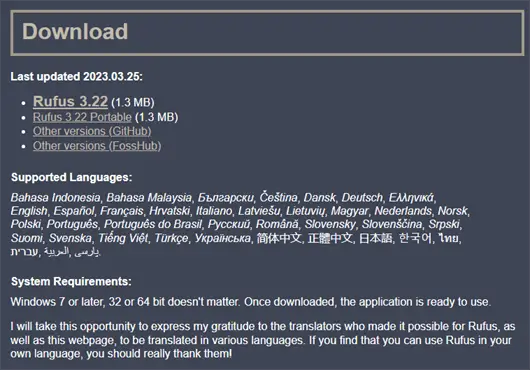
To get started with Rufus Windows 11, you’ll need to download the latest version from the official website. Here’s a step-by-step guide:
- Visit the official Rufus website at https://rufus.ie/.
- Click on the “Download” button.
- Choose the appropriate version for your system (usually the latest version, e.g., Rufus 3.22).
- Save the executable file to your computer.
Pro Tip: Always download Rufus from the official website to ensure you’re getting a safe, malware-free version.
System Requirements for Rufus Windows 11
Before using Rufus to create a Windows 11 bootable USB, ensure your system meets these minimum requirements:
- Windows 8 or later (for full functionality)
- 1 GHz or faster processor
- 1 GB RAM (32-bit) or 2 GB RAM (64-bit)
- 16 GB available hard disk space (32-bit) or 20 GB (64-bit)
- A USB drive with at least 8 GB storage capacity
Creating a Windows 11 Bootable USB with Rufus
Now that you have Rufus downloaded, let’s walk through the process of creating a Windows 11 bootable USB drive:
- Insert your USB drive into your computer.
- Run the Rufus executable file.
- In the “Device” dropdown, select your USB drive.
- Click on “SELECT” and choose your Windows 11 ISO file.
- Under “Image option,” ensure “Standard Windows installation” is selected.
- Choose GPT as the partition scheme for UEFI systems (recommended for Windows 11).
- Leave other settings at their default values unless you have specific requirements.
- Click “START” to begin the process.
Rufus will now create your Windows 11 bootable USB drive. The process typically takes 10-20 minutes, depending on your system’s speed and the size of the ISO file.
Advanced Rufus Windows 11 Features
Bypassing TPM and CPU Checks
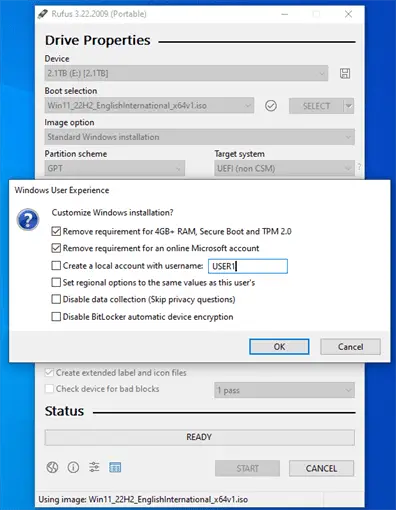
One of the most valuable features of Rufus Windows 11 is its ability to bypass TPM 2.0 and CPU compatibility checks. This is particularly useful for IT professionals working with older hardware that doesn’t meet Microsoft’s strict Windows 11 requirements.
To use this feature:
- Follow the steps above to create a bootable USB.
- When you reach step 5, you’ll see an option for “Remove requirement for 4GB+ RAM, Secure Boot and TPM 2.0.”
- Select this option to create a Windows 11 installation media that bypasses these checks.
Caution: While this allows installation on unsupported hardware, it may affect system stability and security. Use this feature at your own risk and only in appropriate scenarios.
Choosing Between GPT and MBR
Rufus Windows 11 supports both GPT (GUID Partition Table) and MBR (Master Boot Record) partition schemes. Here’s a quick guide on which to choose:
- GPT: Recommended for modern systems with UEFI firmware. Required for drives larger than 2TB.
- MBR: Use for older systems with BIOS firmware or if you need compatibility with legacy systems.
To select your preferred scheme:
- In the Rufus interface, look for the “Partition scheme” dropdown.
- Choose “GPT” for UEFI systems (recommended for Windows 11) or “MBR” for BIOS systems.
Troubleshooting Common Rufus Windows 11 Issues
Even with its user-friendly interface, you might encounter some issues when using Rufus Windows 11. Here are solutions to common problems:
1. “ISO image is invalid” Error
- Ensure you’ve downloaded a genuine Windows 11 ISO from Microsoft.
- Try re-downloading the ISO file, as it may have been corrupted during the download process.
2. USB Drive Not Detected
- Try a different USB port.
- Ensure the USB drive is not write-protected.
- Update your USB drivers.
3. “Not enough space available on the disk” Error
- Use a USB drive with at least 8GB capacity.
- If the drive has sufficient capacity but still shows this error, try reformatting it before using Rufus.
4. Rufus Freezes During Process
- Disable your antivirus temporarily (remember to re-enable it after).
- Run Rufus as administrator.
- Try using an older version of Rufus if the problem persists.
Comparing Rufus Versions for Windows 11
Let’s take a closer look at the recent versions of Rufus optimized for Windows 11:
| Feature | Rufus 3.18 | Rufus 3.20 | Rufus 3.22 |
|---|---|---|---|
| Windows 11 Support | Yes | Yes | Yes |
| TPM Bypass | Yes | Yes | Yes |
| Windows To Go Support | No | Yes | Yes |
| Improved UEFI Boot | No | Yes | Yes |
| Extended Windows 11 Options | No | No | Yes |
As you can see, each version brings new improvements, with Rufus 3.22 offering the most comprehensive set of features for Windows 11 installation.
Alternatives to Rufus for Windows 11 Installation
While Rufus is an excellent tool, it’s always good to know about alternatives:
- Microsoft’s Media Creation Tool: Official tool from Microsoft, but lacks some advanced features of Rufus.
- Etcher: Open-source, cross-platform tool known for its simplicity.
- UNetbootin: Another open-source option, but with fewer customization options than Rufus.
- WinToUSB: Paid software with additional features for creating portable Windows installations.
Despite these alternatives, Rufus remains a top choice for many IT professionals due to its balance of features, ease of use, and regular updates.
Best Practices for Using Rufus Windows 11
To get the most out of Rufus Windows 11, consider these best practices:
- Always use the latest version: This ensures you have the most up-to-date features and bug fixes.
- Backup important data: Before creating a bootable USB, ensure you’ve backed up any important data on the drive.
- Verify your ISO: Use the SHA-256 hash provided by Microsoft to verify the integrity of your Windows 11 ISO.
- Use a high-quality USB drive: Opt for reputable brands to minimize the risk of corrupted installations.
- Keep Rufus portable: Consider using the portable version of Rufus for easy use across multiple systems.
The Future of Rufus and Windows 11
As Windows 11 continues to evolve, we can expect Rufus to adapt and offer new features. The developer, Pete Batard, has consistently updated Rufus to meet new challenges, and this trend is likely to continue.
Some potential future developments might include:
- Enhanced support for Windows 11 ARM installations
- More advanced customization options for Windows 11 deployments
- Improved integration with other tools in the IT professional’s toolkit
Key Takeaways
- Rufus Windows 11 is a powerful, free tool for creating bootable Windows 11 USB drives.
- It offers features like TPM and CPU check bypasses, making it invaluable for installations on older hardware.
- The latest version (Rufus 3.22 as of March 2023) provides the most comprehensive Windows 11 support.
- Always download Rufus from the official website to ensure safety and legitimacy.
- While alternatives exist, Rufus remains a top choice for many IT professionals due to its feature set and regular updates.
FAQ
- Is Rufus safe to use for Windows 11 installation? Yes, Rufus is safe when downloaded from the official website. It’s open-source and widely trusted by IT professionals.
- Can Rufus Windows 11 bypass TPM requirements? Yes, Rufus offers options to bypass TPM 2.0 and CPU compatibility checks for Windows 11 installation.
- What’s the difference between Rufus 3.18 and 3.22 for Windows 11? Rufus 3.22 offers more advanced features for Windows 11, including improved UEFI boot support and extended Windows 11 installation options.
- Do I need to format my USB drive before using Rufus? Rufus will format the drive during the process, so pre-formatting isn’t necessary. However, ensure you’ve backed up any important data.
- Can Rufus create a Windows 11 bootable USB on a Mac? Rufus is a Windows-only application. For Mac users, alternatives like Etcher or UNetbootin are recommended.
- Is it legal to use Rufus to bypass Windows 11 requirements? While Rufus itself is legal, bypassing Windows 11 requirements may violate Microsoft’s terms of service. Use this feature responsibly and at your own risk.
- How long does it take to create a Windows 11 bootable USB with Rufus? Typically, it takes 10-20 minutes, depending on your system’s speed and the size of the ISO file.
- Can I use Rufus to create a bootable USB for Windows 11 ARM? Yes, Rufus supports creating bootable USBs for Windows 11 ARM editions, although some features may be limited.
- Does Rufus work with all types of USB drives? Rufus works with most USB drives, but it’s recommended to use high-quality drives from reputable manufacturers for best results.
- Can I use Rufus to install Windows 11 without an internet connection? Yes, Rufus can create a bootable USB that allows for offline installation of Windows 11.
By mastering Rufus Windows 11, IT professionals can significantly streamline their Windows 11 deployment processes, saving time and reducing headaches. Whether you’re upgrading a single machine or rolling out Windows 11 across an entire organization, Rufus proves to be an invaluable tool in your arsenal.
Related Posts:
- Rufus Windows 11 FAQs
- Rufus Windows 11 Download
- Download Windows 10 to Flash Drive
- Install Windows 11 on unsupported hardware
More information:
- UEFI/GPT-based hard drive partitions
- Windows Setup: Installing using the MBR or GPT partition style
- To download Rufus, Click this link: https://rufus.ie/en/
- Rufus FAQs